This section is about some of the jobs that I’ve wanted to do and some that I’ve had to do on my caravan. As I wrote elsewhere, after my wife died in 2011 I decided to give up caravanning, so I sold my five-year-old Bailey and all the equipment. Four months later, realizing that I had acted impetuously, I started looking for another caravan I found my present one on the Caravan Club’s For Sale ads. Not being sure how long I would want to caravan on my own, I bought my 2001 Avondale Rialto. I bought it as seen from an executor but it came fully equipped and with two awnings, groundsheets and water containers all ready to go. Unfortunately, in spite of having four years’ worth of recent service records, with damp reports ticked and marked “OK”, I quickly discovered that the van had a damp problem. Dealing with the rotten lining and timber became the number one priority.
Within hours of getting the van home, I discovered the dampness around the toilet in the end bathroom. When I viewed the van, the end bathroom was filled with awnings, Aquaroll and Wastemaster together with groundsheets, wheel ramps and a sundry collection of equipment. Not until I had it all moved into the garage did I find the soggy wallboard.
I started the job by removing the toilet and reservoir filler. To remove the toilet pan, first, remove the holding tank through the access door. Screwed into the floor of the caravan are four long cross-headed screws. The front two are easily reached whilst the rear two are made easier by using a piece of mirror to see them. Once the screws are removed, the toilet unit is lifted off the hanger attached to the wall. I also removed the holding tank door and surround. Back inside the van, by using a damp meter I estimated the extent of the dampness. Having marked out an area a bit less than a square metre, I began to cut through the wall board with a sharp Stanley knife pulled along a straight edge. I used many draws of the blade with light pressure rather than pressing too hard. Eventually, the blade was into the polystyrene and I could begin to peel away the soggy wallboard. The dampness had separated the wallboard from the polystyrene so it came away easily. Once that was out of the way, the blackened, saturated wood framing could be seen. I decided which sections would need to be removed and replaced and which would be still sound after drying out. I began cutting the sections with a small tenon saw and carefully separating them from the outer skin. Being wet, most came away fairly easily but some required careful scraping with a broad chisel – the outer skin is easily damaged, even from the inside. New wood of the same dimensions as the existing was sourced from Wickes or B&Q, cut to length and glued to the outer skin with a grab adhesive. Where new timber-framed openings, I left the wood clamped overnight with a protecting piece on the outside.
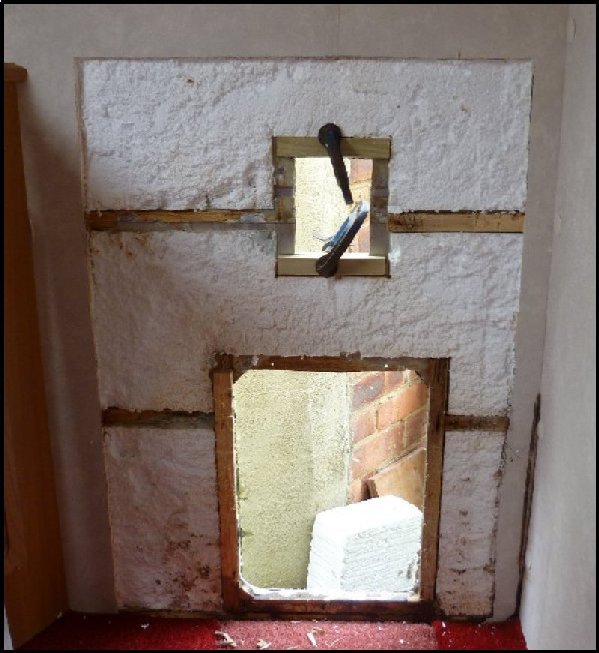
Next, I needed some wall-board. The only wall-boards I could find were 8’x4’ – much larger than what I wanted and then not a true match. I decided to try to make a piece. First I found a piece of 3mm plywood which I covered both sides with sheets of good quality brown parcel paper. White PVA was used for the paper with a good covering being given to both sides That was left to dry and by sticking paper to both sides, the ply dried flat. Doing only one side will allow the sheet to bend.
Now it was time to study the existing wallboard. It was basically grey so I mixed a bowl of white emulsion paint, gradually adding some black powder paint. It took several tries to reach the shade I wanted and then it was rolled on and left to dry. The same mix was darkened slightly more and the paint was applied with a dry sponge dabbed onto the surface. When I was satisfied with the result, the board was allowed to thoroughly dry before being painted over with thinned PVA solution. That seals the surface and gives it a slight sheen.
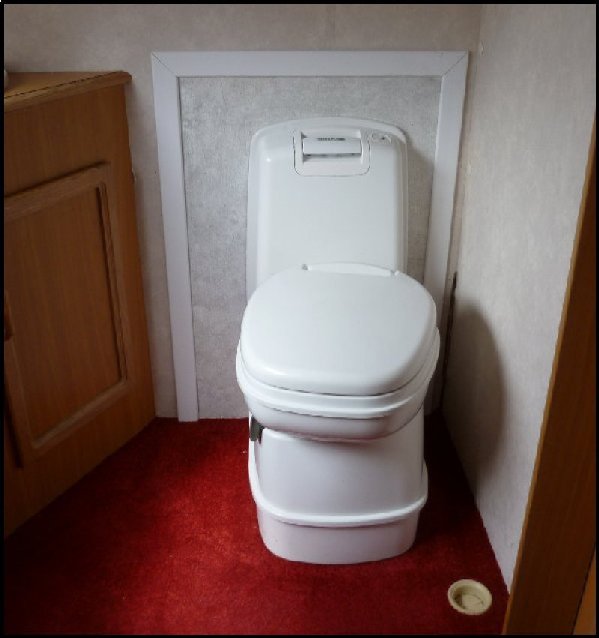
Once dry the board was glued to the framework with grab adhesive and stapled around the edges. To cover the joint, a length of uPVC moulding was mitred and fixed with white silicon.
The dampness had been caused by a badly fitting reservoir filler surround. That was well cleaned and new mastic was applied before refitting.
